Share: Difference between revisions
No edit summary |
No edit summary |
||
| Line 18: | Line 18: | ||
* The recommended method to connect to a WebDAV share is to use the University available software called WebDrive. See instructions on downloading and installing WebDrive here: http://answers.vt.edu/kb/entry/2284 | * The recommended method to connect to a WebDAV share is to use the University available software called WebDrive. See instructions on downloading and installing WebDrive here: http://answers.vt.edu/kb/entry/2284 | ||
* After installing the program, run it | * After installing the program, run it | ||
* Click on "New Site" to bring up the Site Wizard | * Click on "New Site" to bring up the Site Wizard | ||
* Enter a name you want to call this share -- it can be called anything you want | * Enter a name you want to call this share -- it can be called anything you want | ||
* Select the drive letter you wish map this share to | * Select the drive letter you wish map this share to | ||
[[Image:WebDavWindows1.jpg]] | |||
* Click on "Next" | * Click on "Next" | ||
* Select "Server type" of "WebDAV" | * Select "Server type" of "WebDAV" | ||
* Check the box for "Connect Securely [[Image:WebDavWindows2.jpg]] | * Check the box for "Connect Securely | ||
[[Image:WebDavWindows2.jpg]] | |||
* Click on "Next" | * Click on "Next" | ||
* Enter the URL for your share which will be https://share.cs.vt.edu/sharename replacing sharename with the name of the share you want to connect to | * Enter the URL for your share which will be https://share.cs.vt.edu/sharename replacing sharename with the name of the share you want to connect to | ||
* Check the box for "Use default port" [[Image:WebDavWindows3.jpg]] | * Check the box for "Use default port" | ||
[[Image:WebDavWindows3.jpg]] | |||
* Click on "Next" | * Click on "Next" | ||
* Select "No Certificate" from the drop-down box [[Image:WebDavWindows4.jpg]] | * Select "No Certificate" from the drop-down box | ||
[[Image:WebDavWindows4.jpg]] | |||
* Click on "Next" | * Click on "Next" | ||
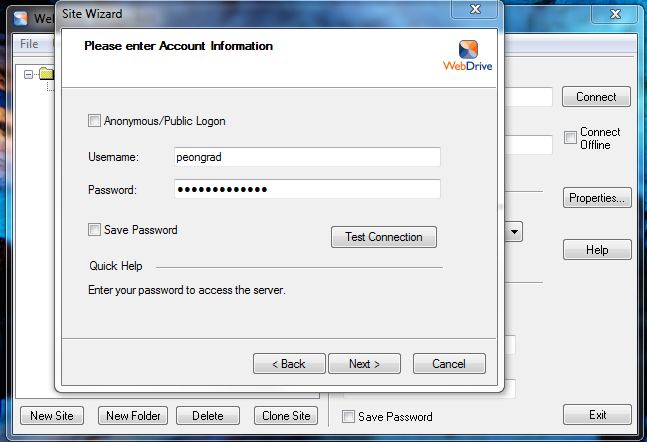
* Enter your username/password -- this will generally be your CS SLO login but varies based on the share you are connecting to [[Image:WebDavWindows5.jpg]] | * Enter your username/password -- this will generally be your CS SLO login but varies based on the share you are connecting to | ||
[[Image:WebDavWindows5.jpg]] | |||
* Click on "Next" | * Click on "Next" | ||
* Click on "Finish" | * Click on "Finish" | ||
==== Mac OS/X ==== | |||
* Switch to the Finder | |||
* Select the "Go" menu and then select "Connect to Server..." | |||
* Enter the URL for your share which will be https://share.cs.vt.edu/sharename replacing sharename with the name of the share you want to connect to | |||
=== Modifying a share === | === Modifying a share === | ||
Contact techstaff@cs.vt.edu with the change you would like to make. | Contact techstaff@cs.vt.edu with the change you would like to make. | ||
Revision as of 13:33, 20 September 2010
How to use share.cs.vt.edu
About
share.cs.vt.edu is a departmental resource to help facilitate collaboration by allowing you to share files with an arbitrary group of users on a variety of computer platforms. Example: a file share among office staff who need access to the same, up to date, documents. share.cs.vt.edu uses WebDAV technology which is based on the already popular HTTP protocol. There are a variety of ways to connect and use a WebDAV resource. Some of them are listed below.
Creating a share
For now, you must contact techstaff@cs.vt.edu to create a share. In the future, we may create a tool that will allow you to create your own share online. Options to consider when you make your request to the techstaff: share name, who should have access, and whether to use CS login or some other login.
Accessing a share
All OSes
If you just need to read or copy a file from a share, then the quickest and easiest way from any Internet connection is to open a web browser and go the URL: https://share.cs.vt.edu/sharename replacing sharename with the name of the share you want to connect to.
Microsoft Windows
- The recommended method to connect to a WebDAV share is to use the University available software called WebDrive. See instructions on downloading and installing WebDrive here: http://answers.vt.edu/kb/entry/2284
- After installing the program, run it
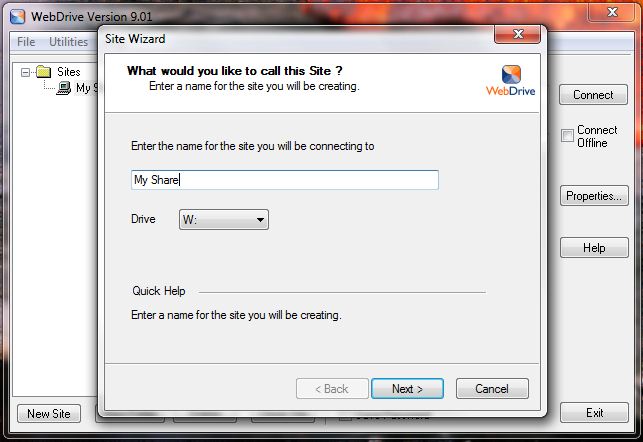
- Click on "New Site" to bring up the Site Wizard
- Enter a name you want to call this share -- it can be called anything you want
- Select the drive letter you wish map this share to
- Click on "Next"
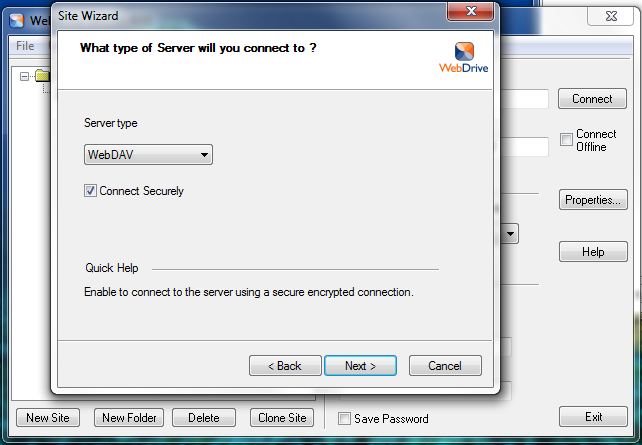
- Select "Server type" of "WebDAV"
- Check the box for "Connect Securely
- Click on "Next"
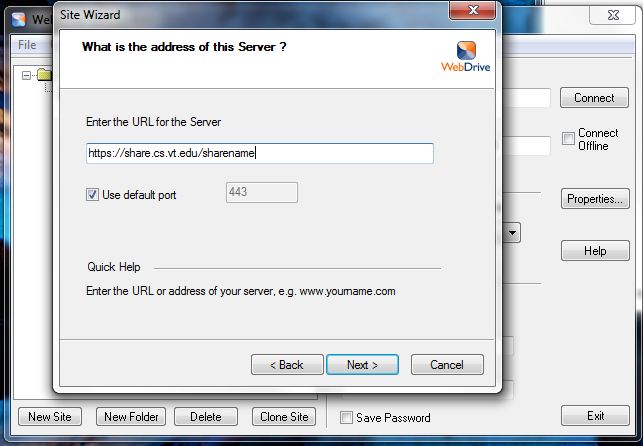
- Enter the URL for your share which will be https://share.cs.vt.edu/sharename replacing sharename with the name of the share you want to connect to
- Check the box for "Use default port"
- Click on "Next"
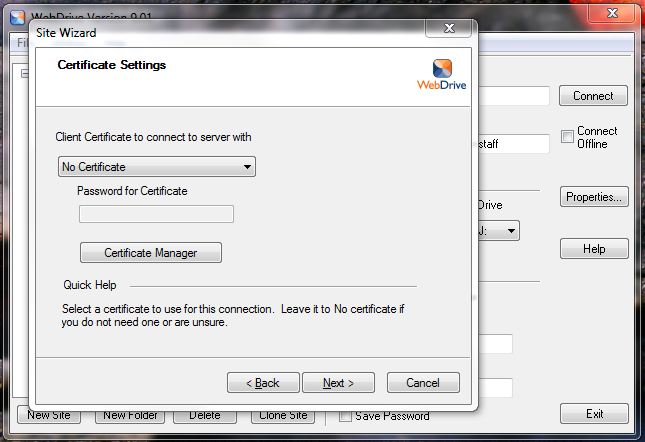
- Select "No Certificate" from the drop-down box
- Click on "Next"
- Enter your username/password -- this will generally be your CS SLO login but varies based on the share you are connecting to
- Click on "Next"
- Click on "Finish"
Mac OS/X
- Switch to the Finder
- Select the "Go" menu and then select "Connect to Server..."
- Enter the URL for your share which will be https://share.cs.vt.edu/sharename replacing sharename with the name of the share you want to connect to
Modifying a share
Contact techstaff@cs.vt.edu with the change you would like to make.
