Cloud Example Jupyter
Work in progress
Introduction
The goal of this project is to support a class teaching basic programming using Jupyter Notebook Jupyter notebook is a single process that supports only one person. To support a whole class, a jupyter notebook process will need to be run for each student. Jupyter offers a Jupyter Hub that automatically spawns these singe user processes. However, a single machine can only support around 50-70 students before suffering performance issues. Kubernetes allows this process to scale out horizontally by spreading the single-user instances across physical nodes. I will give a break down of different pieces needed to make this work and go into more detail on certain aspects.
Workloads
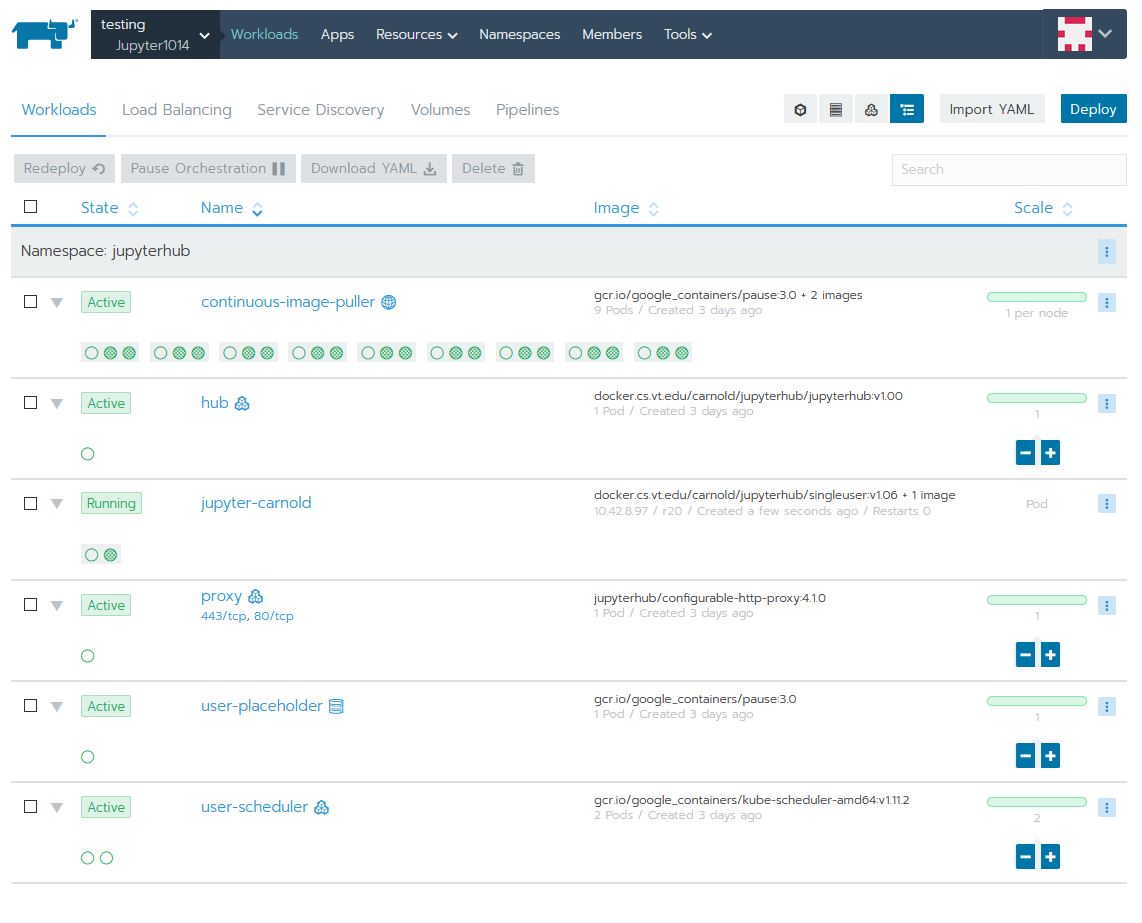
Here is what the Workloads tab looks like:
Details of each deployment:
continuous-image-puller
This deployment:
- Starts a pod on all physical nodes of the cluster. This is called a DaemonSet by kubernetes.
- The purpose of this deployment is to pull the image(s) need to run the single-user Jupyter Notebook and automatically download on any new nodes to the cluster -- basically pre-caching the images. The process of downloading the images the first time it is run on a node can take some time and detract from the user experience.
- The containers in each pod are:
- The primary image that you can see is gcr.io/google_containers/pause:3.0 This is just a simple lightweight container that doesn't do any processing, just to keep the deployment alive
- The other two images are the single-user Jupyter Notebook and a networking tools image (updates iptables). Both of these images are run with a simple echo log command, so again they don't do any processing but the image is downloaded and cached by kubernetes
hub
This deployment:
- Scalable, currently running a single pod
- The purpose of this deployment is to run the JupyterHub process that authenticates the user, configures the proxy, and calls the spawner to create a single-user instance of Jupyter for the user.
- The only container in the pod is docker.cs.vt.edu/carnold/jupyterhub/jupyterhub:v1.00 This is a customized version of the jupyterhub docker image to add the CAS authentication plug-in.
jupyter-carnold
This deployment:
- Runs a single pod
- This is an example of a pod automatically spawned for the user carnold and hosts their single-user instance of Jupyter Notebook
- The containers in this pod are:
- The primary image is docker.cs.vt.edu/carnold/jupyterhub/singleuser:v1.06 This is a customized verison of the jupyter notebook single user docker image to add a custom script that runs on start up.
proxy
This deployment:
- Scalable, currently running a single pod
- The purpose of this deployment is to run Nginx as a reverse proxy redirecting users to their single-user instances of Jupyter Notebook. The proxies get configured by the hub deployment.
- The only container in this pod is jupyterhub/configurable-http-proxy:4.1.0 This is based on Nginx.
- There is an external IP mapped to this service with ports 443 and 80 forwarding to this pod. This allows connections from outside the cluster.
user-placeholder
This deployment:
- Scalable, currently running a single pod
- The purpose of this deployment is to hold a spot (or multiple spots) on the cluster for single-user instances. This effectively reserves the resources (memory and cpu requests) necessary to run a single-user instance of Jupyter Notebook. In theory, you could scale this up to reserve as many places as you need.
- The only container in this pod is gcr.io/google_containers/pause:3.0 Again, this image doesn't do any processing, but keeps the instance alive.
user-scheduler
This deployment:
- Scalable, currently running two pods for redundancy
- The purpose of this deployment is to schedule and spawn the single-user instances of Jupyter Notebook.
- The only container in these pods is gcr.io/google_containers/kube-scheduler-amd64:v1.11.2 This is a complex process, and the image is created by Kubernetes itself. Find out more at: https://kubernetes.io/docs/reference/command-line-tools-reference/kube-scheduler
Services
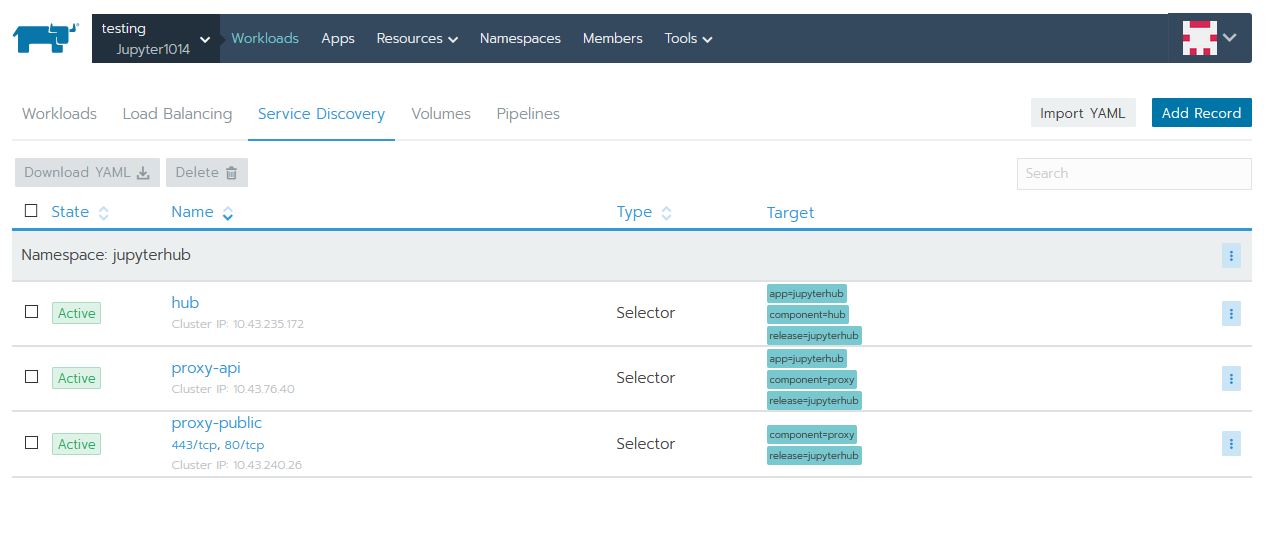
Here is what the Service Discovery tab looks like:
Details of each service:
hub
- Points to the hub deployment API port
- Allows other instances to connect to the Hub's API
proxy-api
- Points to the proxy deployment API port
- Used by hub to configure reverse proxy entries as needed
proxy-public
- Points to the proxy http ports
- Maps the proxy ports to an external IP
Volumes
Here is what the Volumes tab looks like:
Details of each volume:
claim-carnold
- This is a [persistent volume claim
- This volume is dedicated to a single-user Jupyter Notebook, specifically, the user carnold
- The purpose of this volume is to persist user's changes to their notebook across nodes and restarts
hub-db-dir
- This is a [persistent volume claim
- This volume is used by the hub deployment to support a sqlite database for configuration.
- The purpose of this volume is to persist DB changes across nodes and restarts
Config Maps
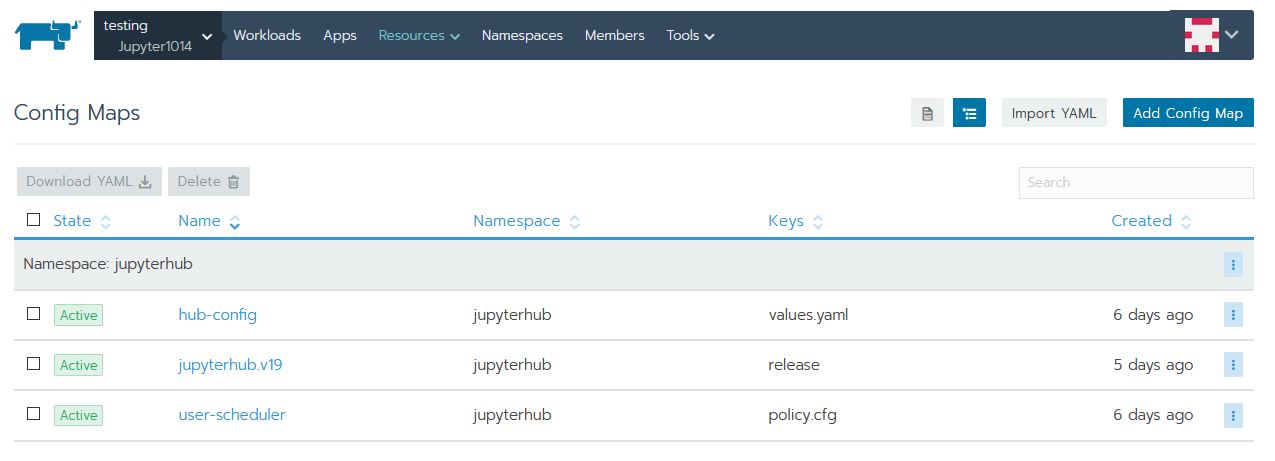
Here is what the Config Maps tab looks like:
Details of each ConfigMap:
hub-config
Used by a python script inside the hub deployment to configure the JupyterHub process. This is what allows custom configuration with a base image.
jupyterhub.v19
user-scheduler
Deployment
Helm Chart
This example was deployed using a Helm Chart The chart used is based on https://zero-to-jupyterhub.readthedocs.io/en/latest/ I only made minor changes to the chart to work with https://cloud.cs.vt.edu You can see the full chart code at: https://version.cs.vt.edu/carnold/jupyterhub/tree/master/charts/jupyterhub Charts make deploying, modifying, and updating complex kubernetes deployments more simple. The CS cloud web UI allows you to use helm charts, and even custom helm charts like the once I created, it calls them Apps and collections of Apps called Catalogs. Charts use templates to create the kubernetes resources, and pulls custom values for the template from a YAML file. Here is the yaml file used for this deployment:
--
  auth:
    type: custom
    custom:
      className: jhub_cas_authenticator.cas_auth.CASAuthenticator
      config:
        cas_login_url: "https://login.vt.edu/profile/cas/login"
        cas_service_url: "https://testing131.cs.vt.edu/hub/login"
        cas_client_ca_certs: "/etc/vtca.crt"
        cas_service_validate_url: "https://login.vt.edu/profile/cas/serviceValidate"
  hub:
    image:
      name: docker.cs.vt.edu/carnold/jupyterhub/jupyterhub
      tag: v1.00
  proxy:
    secretToken: "********"
  singleuser:
    image:
      name: docker.cs.vt.edu/carnold/jupyterhub/singleuser
      tag: v1.06
    lifecycleHooks:
      postStart:
        exec:
          command: ["/tmp/entrypoint.sh"]
    storage:
      capacity: "500Mi"
    memory:
      limit: 128M
      guarantee: 128M
    cpu:
      limit: .5
  cull:
    timeout: 300
Custom Images
I customized a couple of the docker images used for this project. I use tagging to control versioning and allow upgrades, this is very important when it comes to the single user image since it is pre-cached. Here are details about the customization.
Jupyter Hub
The default Jupyter Hub docker image does not include an authentication plug-in for CAS which is used by VT for login. I needed to add the plug-in and add the CA certificate to the docker image. I used our gitlab instance to store my Dockerfile and store the customized docker image in registry.
- See my Dockerfile in the repository: https://version.cs.vt.edu/carnold/jupyterhub/tree/master/jupyterhub
- I then build, tag, and upload the docker image:
- Build:
docker build -t docker.cs.vt.edu/carnold/jupyterhub/jupyterhub:v1.00 . - Upload:
docker push docker.cs.vt.edu/carnold/jupyterhub/jupyterhub:v1.00
- Build:
Jupyter Single User
Similarly, I needed to customize the Jupyter Notebook Single User docker image. This time, it needs a script that is to be run when the Jupyter Notebook starts. The script will merge in changes from a git repository.
- See my Dockerfile in the repository: https://version.cs.vt.edu/carnold/jupyterhub/tree/master/singleuser
- I then build, tag, and upload the docker image:
- Build:
docker build -t docker.cs.vt.edu/carnold/jupyterhub/singleuser:v1.06 . - Upload:
docker push docker.cs.vt.edu/carnold/jupyterhub/singleuser:v1.06
- Build:


